Wear Data Layer Messages & First Wearable Message Example
Data Layer Messages
An application that runs on a wearable device usually utilizes some of the capabilities of a paired handheld device. This means you need two separate Android apps, one that runs on the wearable and another that runs on the handheld. These two apps communicate with one another over the bluetooth link that connects the two devices.
Google Play services Version 5 and later include a Wearable Message API that provides access to the data layer of a data communications link between the two devices. Messages or data move down the protocol stack on the sending side, across the bluetooth link, then up the stack on the receive side. The following diagram shows how a simple message flows through the wearable communications link.
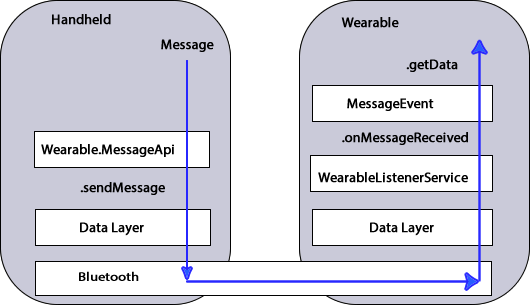
In this example, a handheld sends a message to a wearable using the sendMessage method of the Wearable.MessageApi. On the receiving side, a WearableListenerService monitors the data layer and invokes the onMessageReceived callback when a message arrives. The listener service then performs some application-specific task based on the received message. The WearableListenerService is not the only way to receive data, but it is easy to implement because Android Wear manages its life-cycle.
First Wearable Message
If you have not already done so, Create a Project. The new project wizard in Android Studio creates a project with two main activities, one for the handheld device and another for the wearable. These two activities use the same package name, which is essential for the wearable data layer to work.
Data layer messages can originate from either a handheld or wearable. For bidirectional messaging both the handheld and wearable should implement a message sender and listener.
Implement a Message Sender
This section describes how to send messages to the data layer. The example code shown sends messages from the handheld to the data layer.
Add Build Dependencies
Add the following build dependencies to the build.gradle file (Module:mobile) in the Gradle Scripts folder, if necessary.
dependencies {
  compile fileTree(dir: 'libs', include: ['*.jar'])
  compile 'com.android.support:appcompat-v7:21.0.+'
  compile 'com.google.android.gms:play-services:6.5.+'
}
Add Metadata for Google Play Services
Add Google Play services metadata statement to the manifest of the sending device:
<application>
...
  <meta-data android:name="com.google.android.gms.version"
   android:value="@integer/google_play_services_version" />
</application>
Create the Message Sender
To send a message , update the code in the main Activity of the sending device. For the handheld, modify the code in the mobile branch of the Android Studio project.
- Build a Google Play Services client for the Wearable API.
public class MessageActivity extends Activity implements
  GoogleApiClient.ConnectionCallbacks,
  GoogleApiClient.OnConnectionFailedListener {

  GoogleApiClient googleClient;

  @Override
  protected void onCreate(Bundle savedInstanceState) {
    super.onCreate(savedInstanceState);
    setContentView(R.layout.activity_handheld);

  // Build a new GoogleApiClient for the Wearable API
  googleClient = new GoogleApiClient.Builder(this)
    .addApi(Wearable.API)
    .addConnectionCallbacks(this)
    .addOnConnectionFailedListener(this)
    .build();
  }
      // Data layer and lifecycle implementation (Step 2)
      ...
}
- Add callback methods for the data layer and lifecycle events. For simplicity, send a message in the onConnected callback method.
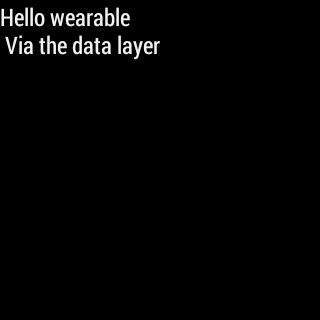
// Connect to the data layer when the Activity starts
@Override
protected void onStart() {
  super.onStart();
  googleClient.connect();
}

// Send a message when the data layer connection is successful.
@Override
public void onConnected(Bundle connectionHint) {
  String message = "Hello wearable\n Via the data layer";
  //Requires a new thread to avoid blocking the UI
  new SendToDataLayerThread("/message_path", message).start();
 }

// Disconnect from the data layer when the Activity stops
@Override
protected void onStop() {
  if (null != googleClient && googleClient.isConnected()) {
    googleClient.disconnect();
    }
    super.onStop();
}

// Placeholders for required connection callbacks
@Override
public void onConnectionSuspended(int cause) { }

@Override
public void onConnectionFailed(ConnectionResult connectionResult) { }
- Define a class that extends the Thread class and implements a method that sends your message to all nodes currently connected to the data layer. This task can block the main UI thread, so it must run in a new thread.
class SendToDataLayerThread extends Thread {
  String path;
  String message;

  // Constructor to send a message to the data layer
  SendToDataLayerThread(String p, String msg) {
    path = p;
    message = msg;
  }

  public void run() {
    NodeApi.GetConnectedNodesResult nodes = Wearable.NodeApi.getConnectedNodes(googleClient).await();
    for (Node node : nodes.getNodes()) {
      SendMessageResult result = Wearable.MessageApi.sendMessage(googleClient, node.getId(), path, message.getBytes()).await();
      if (result.getStatus().isSuccess()) {
        Log.v("myTag", "Message: {" + message + "} sent to: " + node.getDisplayName());
      }
      else {
        // Log an error
        Log.v("myTag", "ERROR: failed to send Message");
      }
    }
  }
}
Implement a Message Listener
You can monitor the data layer for new messages using either a listener service or listener activity. This section explains how to implement a listener service for messages. For the wearable, modify the code in the wear branch of the Android Studio project.
Add Build Dependencies
Add wearable SDK dependencies to the build.gradle file (Module:wear) in the Gradle Scripts folder, as necessary.
dependencies {
  compile fileTree(dir: 'libs', include: ['*.jar'])
  compile 'com.google.android.support:wearable:1.1.+'
  compile 'com.google.android.gms:play-services-wearable:6.5.+'
}
Add Listener Service to Manifest
Enable the data layer listener in the manifest file.
<uses-feature android:name="android.hardware.type.watch" />

<application
  ...
  <service android:name=".ListenerService">
    <intent-filter>
      <action android:name="com.google.android.gms.wearable.BIND_LISTENER" />
    </intent-filter>
  </service>
</application>
Create a Listener Service Class
Create a listener in the wear application that extends the WearableListenerService. This example logs any received message to the debug output.
public class ListenerService extends WearableListenerService {

  @Override
  public void onMessageReceived(MessageEvent messageEvent) {

    if (messageEvent.getPath().equals("/message_path")) {
      final String message = new String(messageEvent.getData());
      Log.v("myTag", "Message path received on watch is: " + messageEvent.getPath());
      Log.v("myTag", "Message received on watch is: " + message);
    }
    else {
      super.onMessageReceived(messageEvent);
    }
  }
}
Display Received Messages
The wearable listener service cannot directly update the wearable UI because it runs on a different thread. The following example shows how to forward received messages to the main Activity using the LocalBroadcastManager.
- In the ListenerService class, broadcast the received data layer messages locally.
@Override
public void onMessageReceived(MessageEvent messageEvent) {

    if (messageEvent.getPath().equals("/message_path")) {
      final String message = new String(messageEvent.getData());

      // Broadcast message to wearable activity for display
      Intent messageIntent = new Intent();
      messageIntent.setAction(Intent.ACTION_SEND);
      messageIntent.putExtra("message", message);
      LocalBroadcastManager.getInstance(this).sendBroadcast(messageIntent);
    }
    else {
        super.onMessageReceived(messageEvent);
    }
- In the wearable Activity, register to receive broadcasts from the ListenerService.
@Override
protected void onCreate(Bundle savedInstanceState) {
  // Basic UI code, generated by New Project wizard.
          ...

  // Register the local broadcast receiver, defined in step 3.
  IntentFilter messageFilter = new IntentFilter(Intent.ACTION_SEND);
  MessageReceiver messageReceiver = new MessageReceiver();
  LocalBroadcastManager.getInstance(this).registerReceiver(messageReceiver, messageFilter);
}
- In the wearable Activity, define a nested class that extends BroadcastReceiver, implements the onReceive method, and extracts the message. This example receives and displays the message the wearable UI.
  public class MessageReceiver extends BroadcastReceiver {
    @Override
    public void onReceive(Context context, Intent intent) {
      String message = intent.getStringExtra("message");
      // Display message in UI
      mTextView.setText(message);
    }
  }
}
Keep in mind that this example is not a full implementation. You must unregister your application from the local broadcast manager when the application stops. Otherwise you can duplicate the registration of the same application, which results in duplicate local broadcasts.
Try the First Data Layer App
Make sure the handheld and wearable are successfully paired. If not, see Set Up the Development Environment.
Start the “wear” app in Android Studio. It displays the default Hello message generated by the Android Studio new project wizard:

Then launch the handheld app. The wearable display changes to the message sent from the handheld device through the wearable data layer.
Example
The full Android Studio project for data layer messages is posted athttps://github.com/LarkspurCA/WearableMessage.git.
Comments
Post a Comment